Wednesday, June 25, 2014

Birthday Hugs layout

Hello and thanks for popping by!

Today I have a layout to share with you all using lots of Couture goodness!  I loved creating this page and am hoping to teach it soon.


To start I embossed one of the plainer pieces of patterned paper with the new embossing folder Large Only One.  I have then sanded it back for that lovely white washed look.


I have then layered my pattered papers and stamped around them. 

To embellish my page I have used lots of Couture Dies.  I used the really pretty Cappuccino doily die to mat my photo one.  Using the circle nesting dies I cut my photo to sit inside my doily.

The black fancy strip is a die from the Momento Ornamental Lace Dies collection called Chandeliers Set.  This is a great set and comes with two border dies.

I have also used another new die just under the camera embellishment.  Its called Photo Strip.  this is from the new release The Van Roe collection.

Here is a little close up of my page.  You can see a little more closely the pretty dies I have used.


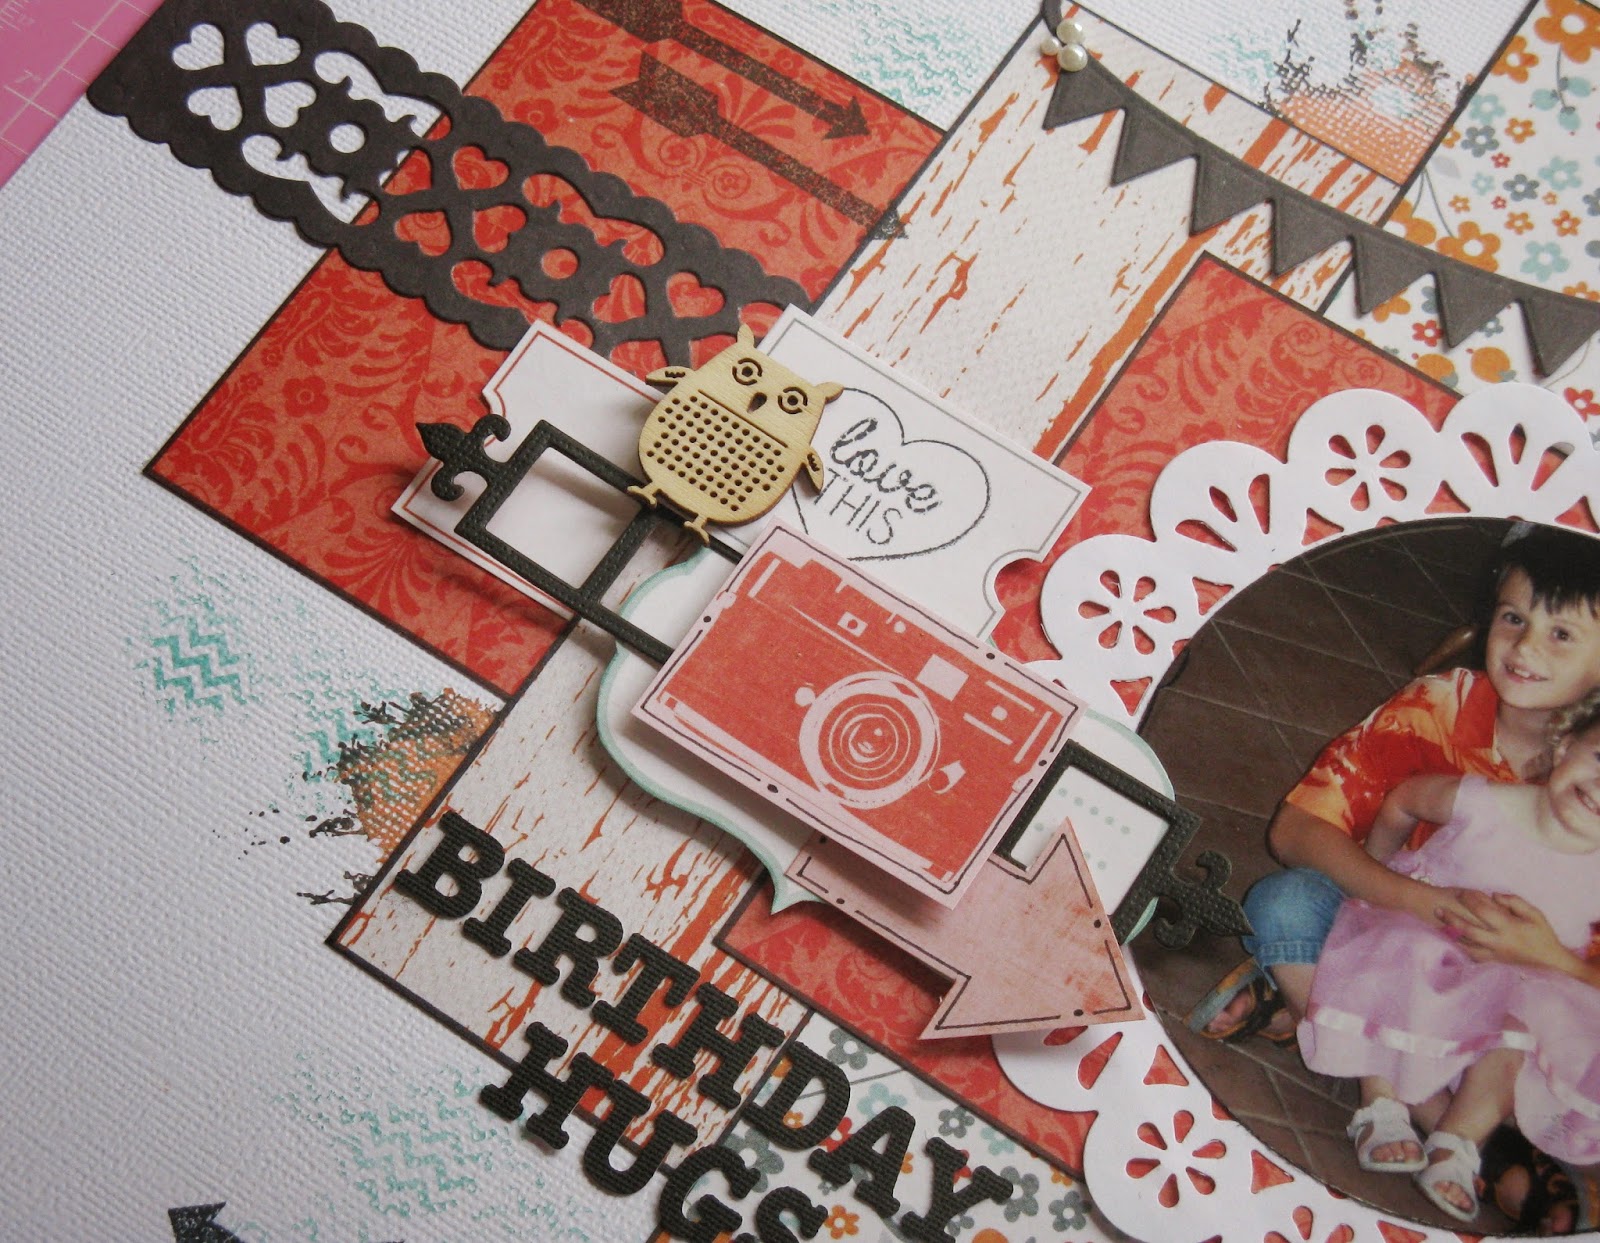
I have also used the Party Banner die.  This was an earlier release from the Secret Treasures Collection.

Here's a little tip too.  To make your papers "pop" instead of matting on black cardstock, draw a fine line around them with a black sharpie.  It gives the illusion of being matted without all the extra bulk.

Thanks again for letting me share!

Until next time


Couture Creations products used


Saturday, June 21, 2014

Graphic 45 - A Ladies Diary

Hi friends

Hope this post finds you well and happy.

I have had this paper pad in my stash for AGES and I finally had the courage to cut into it.  Yep I love Graphic 45 but when it comes to actually using it, I have panic attacks.  Seriously their paper is just so beautiful and there is so much going on that I struggle to make that first cut.  In the end I just have to tell myself that it is just paper!  Anyway here is what I came up with using the Graphic 45 paper line A Ladies Diary.


I have used some Twiddly Bitz chippy, prima flowers and the stunning stick pin is by Jeanette Bagley who was on the Mad About Scrappin design team with me.  Oh she makes the most beautiful pins.

I was really pleased with how this turned out considering it took me forever to make that first cut!

Thanks for stopping

Until next time

x

Saturday, June 14, 2014

Magnolia Birthday Card

Hello!  Wowsers, the weather has really turned cool the last few days and its been perfect for staying inside and scrapping.  Well that's the excuse that I use anyway! hehehehe. 

I have a card to share today.  This is a card I made for my cousin for her birthday a couple of weeks ago.  I haven't made many cards at all lately but I really love making them when I know the recipient really appreciates them!


These papers are the very pretty papers called Prairie Chic by Bo Bunny.  I have the 6 x 6 paper pad which I used for this card and also the 12 x 12 but I still haven't cut into my 12 x 12's yet as they are sooo pretty I just want to look at them a little longer hehehehe.

Still trying to get the hang of my Copic markers.  I need LOTS of practice. 

Thanks for popping by and try and stay warm!

Hugs

Monday, June 9, 2014

Gift box

Hi everyone! 

I love to make little boxes and books that are interactive.  Lift a flap here, find a hidden tag there, so today I have a little treat box to share.


This is the box closed up.  But this is what it looks like when the little belly band is slipped off and it is all open.


It has a little drawer underneath that slides out for some treats.

Here is a quick run down on how I made it.

You will need 3 pieces of cardstock.

1 x 8.5 inches x 5 inches
2 x 5 inches x 7 inches

Score your 8.5 inch x 5 inch as follows scoring down the short side

Score at 1.5 inches, 2.5/8 inches, 5.75 inches and 6 5/8 inches.

This is what it should look like


This is going to be the back cover that wraps around your box.

Next you will need to make the drawer.

Using one of your 5 x 7 pieces score 1 inch in from each side.


Cut on both opposite ends up to the score line to create tabs that can then be stuck down to create your drawer.


Lastly you will need to make the cover that wraps around the inside drawer.  Here are the measurements.

Using your last piece of 5 inch x 7 inch score at 3/4 inch, 1.7/8 inch, 4,7/8inch and 6 inches.


Here is a look at how it all goes together.


Now you will need to cover your pieces.  I have used the gorgeous papers from the Damask Delight paper pad .

Here is how I created the frame window

Before adhering your patterned paper to the inside of your drawer, using the Light Box Frame die cut one and lay it on paper.  Trace around the inside square.


Using a knife and ruler cut out the frame.


Then cut two of the Light Box Frame die from black cardstock and stick over the top of your square cut out.  You can then place some acetate underneath before adhering it to your base.


Once your little treat box is complete you will need to make a belly band to hold it together and give it a bit of "glam".

I used a piece of black cardstock and using the Small dots embossing folder, I embossed the whole length of it.  To make your tag, I cut from the Victorian Nesting Dies and stamped my sentiment.  I then cut a doily in half using the larger doily die from the Cameo set and tucked it under the top and bottom of my sentiment.

Here's a closer look at the belly band.


Thanks for stopping by. Until next time


Couture Creations products used:


CO723747 Light Box Frame The Metricon Collection